Difference between revisions of "Iris Split Keyboard"
| (16 intermediate revisions by one user not shown) | |||
| Line 1: | Line 1: | ||
| − | |||
| − | |||
__NOTITLE__ | __NOTITLE__ | ||
| Line 6: | Line 4: | ||
<div class="whitebox"> | <div class="whitebox"> | ||
| − | = | + | = Tented Iris Cases = |
| − | + | ||
| − | + | [[File:Iris Pastel Green Black 01.jpg|1000px|link=]] | |
| − | |||
| − | + | The Iris is a split ergo keyboard designed by keeb.io. | |
| − | + | I developed the tented iris case in 2018 as an inexpensive and elegant solution for tenting (tilting) the case. It has been updated over the years to support the latest PCB versions, of which there are many. | |
| + | The tenting system works through standoffs that change the angle the board tilts (side to side). Three sets of standoffs/legs are provided. | ||
| − | + | Each case comes fully assembled including an acrylic plate. | |
| − | + | ||
| − | |||
| − | + | Photos and colour options: '''[https://imgur.com/a/0V3lUTj https://imgur.com/a/0V3lUTj]''' | |
| + | Updated photos: '''[https://imgur.com/a/O6SvGwH https://imgur.com/a/O6SvGwH]''' | ||
| + | |||
| + | '''Pricing:''' | ||
| + | * Low profile - $170 AUD | ||
| + | * High profile - $200 AUD | ||
| + | |||
| + | |||
| + | '''What you need to complete the keyboard:''' | ||
| + | * An Iris PCB | ||
| + | * Short USB C to C cable to connect the two sides | ||
| + | * USB C cable to connect to your computer | ||
| + | * Switches (52-56) | ||
| + | * Optional rotary encoders | ||
| + | * Optional stabilisers for 2u keys | ||
| + | * Compatible ortho keycaps | ||
| + | |||
| + | |||
| + | Visit Keebio to see their range of PCBs and parts. | ||
| + | |||
| + | https://keeb.io/collections/iris-split-ergonomic-keyboard | ||
| + | |||
| + | '''How to purchase''' | ||
| + | |||
| + | [[Contact|Send me a message]]. | ||
| + | |||
| + | |||
| + | [[File:Iris Pastel Pink 05.jpg|1000px|link=]] | ||
| + | </div> | ||
| + | |||
| + | |||
| + | <div class="whitebox"> | ||
| + | = See more = | ||
== Videos == | == Videos == | ||
* Juju Cables: https://youtu.be/FBD-LC1K2ds | * Juju Cables: https://youtu.be/FBD-LC1K2ds | ||
| Line 41: | Line 68: | ||
| − | |||
| − | |||
| − | |||
| − | |||
| − | + | https://i.imgur.com/q9koc89.jpg | |
| + | Kingk22, Matte Black with Snow middle. | ||
| + | |||
| + | |||
| + | |||
| + | https://i.imgur.com/5GDRDVC.jpg | ||
| + | |||
| + | JohnWest, Matte Black with Snow bottom plate. | ||
| + | |||
| + | </div> | ||
| + | <!-- | ||
<div class="whitebox"> | <div class="whitebox"> | ||
| − | = Important note for buyers of my iris cases! = | + | = Important note for buyers of my iris cases! (2018) = |
It has come to my attention that the right side of the case can be too tight due to the promicro port. | It has come to my attention that the right side of the case can be too tight due to the promicro port. | ||
This can be solved by removing the plastic spacer so that the promicro sits closer to the PCB. | This can be solved by removing the plastic spacer so that the promicro sits closer to the PCB. | ||
| − | You can follow a guide here on accomplishing this: https://imgur.com/a/M9r3EW9 | + | '''You can follow a guide here on accomplishing this: https://imgur.com/a/M9r3EW9''' |
| − | + | Without the plastic spacer, the promicro might be too close to the switch pins. Trim down the switch pins as much as possible and apply insulating tape if it looks like it will touch and create a short. | |
| − | |||
</div> | </div> | ||
| Line 65: | Line 97: | ||
<div class="whitebox"> | <div class="whitebox"> | ||
| − | + | = FAQ (for users) = | |
| − | + | ||
| − | + | ||
| − | + | ||
| − | = FAQ = | + | |
=== Why are the instructions in it's own bag? === | === Why are the instructions in it's own bag? === | ||
This is to keep it as flat as possible and protect the sheet + stickers. If it was packaged with the iris case, the instructions and/or stickers would be creased and bent as the whole thing is wrapped. | This is to keep it as flat as possible and protect the sheet + stickers. If it was packaged with the iris case, the instructions and/or stickers would be creased and bent as the whole thing is wrapped. | ||
| Line 77: | Line 105: | ||
=== Why is there so much packaging? (the zip lock/self seal bags) === | === Why is there so much packaging? (the zip lock/self seal bags) === | ||
| − | Some parts need to be kept separate | + | Some parts need to be kept separate such as the aluminium standoffs and thumbscrew feet. If not, the anodisation can get scratched off. |
| − | + | The screws and M2 standoffs are separate because it was easier to pack, this will be consolidated in the future. | |
| − | I've | + | I've also left branding/markings/labels off most of the bags so that they can be reused. They are thicker and should last longer ( ͡° ͜ʖ ͡°). |
| Line 101: | Line 129: | ||
</div> | </div> | ||
| + | --> | ||
Latest revision as of 13:32, 7 January 2024
Tented Iris Cases
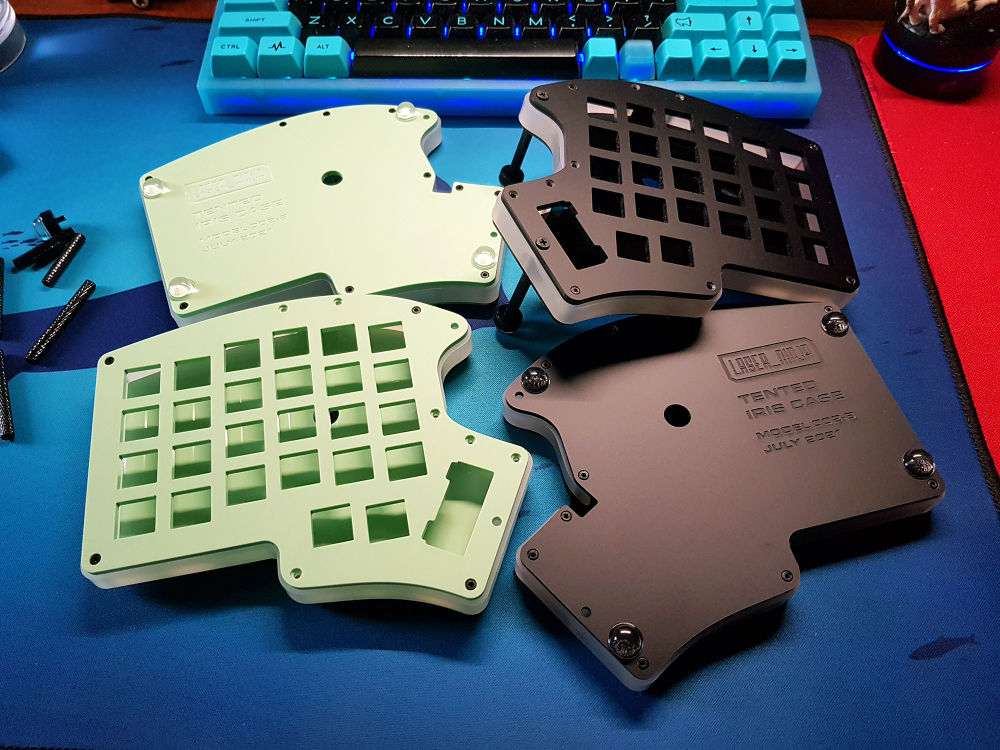
The Iris is a split ergo keyboard designed by keeb.io.
I developed the tented iris case in 2018 as an inexpensive and elegant solution for tenting (tilting) the case. It has been updated over the years to support the latest PCB versions, of which there are many.
The tenting system works through standoffs that change the angle the board tilts (side to side). Three sets of standoffs/legs are provided.
Each case comes fully assembled including an acrylic plate.
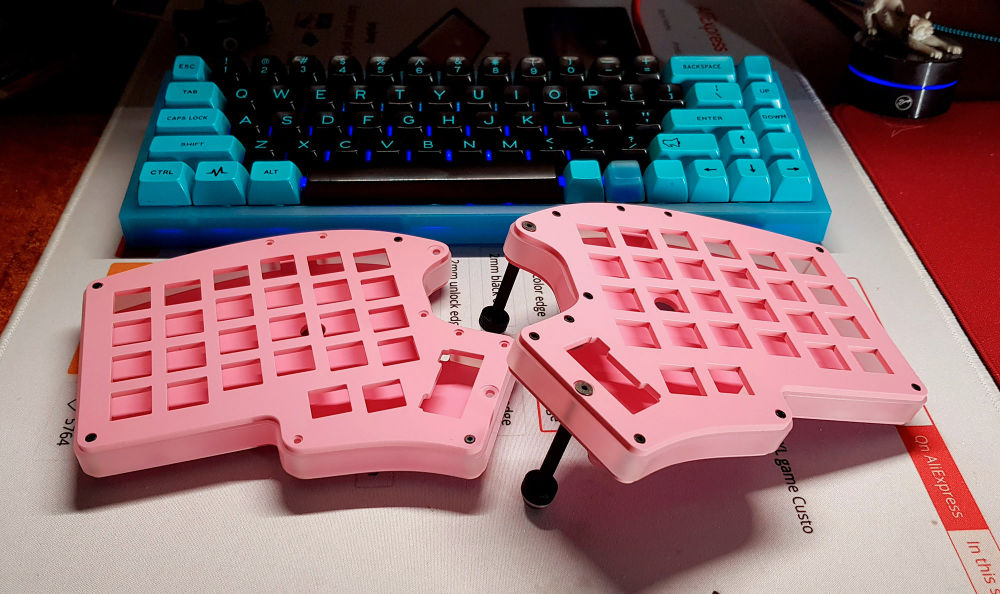
Photos and colour options: https://imgur.com/a/0V3lUTj
Updated photos: https://imgur.com/a/O6SvGwH
Pricing:
- Low profile - $170 AUD
- High profile - $200 AUD
What you need to complete the keyboard:
- An Iris PCB
- Short USB C to C cable to connect the two sides
- USB C cable to connect to your computer
- Switches (52-56)
- Optional rotary encoders
- Optional stabilisers for 2u keys
- Compatible ortho keycaps
Visit Keebio to see their range of PCBs and parts.
https://keeb.io/collections/iris-split-ergonomic-keyboard
How to purchase
See more
Videos
- Juju Cables: https://youtu.be/FBD-LC1K2ds
- TaeKeyboards: https://youtu.be/0P6oIOB-whM
- The Board Podcast: https://youtu.be/S-uBJfyIlWY
Photos
- Tented Iris Case options: https://imgur.com/a/dEqaHzs
- Tented Iris Case customer's photos: https://imgur.com/a/acR1qyF
- Acrylic stuff I have made: https://imgur.com/a/aWvVWB6
- Update #1 album: https://imgur.com/a/cawZjnU
- Smoke update album: https://imgur.com/a/25koSc7
- Update #2 album: https://imgur.com/a/bUhbsa2

Kingk22, Matte Black with Snow middle.
JohnWest, Matte Black with Snow bottom plate.